How to Prepare an Image for AI Image-to-Video: Format, Size and Aspect Ratio Before You Upload
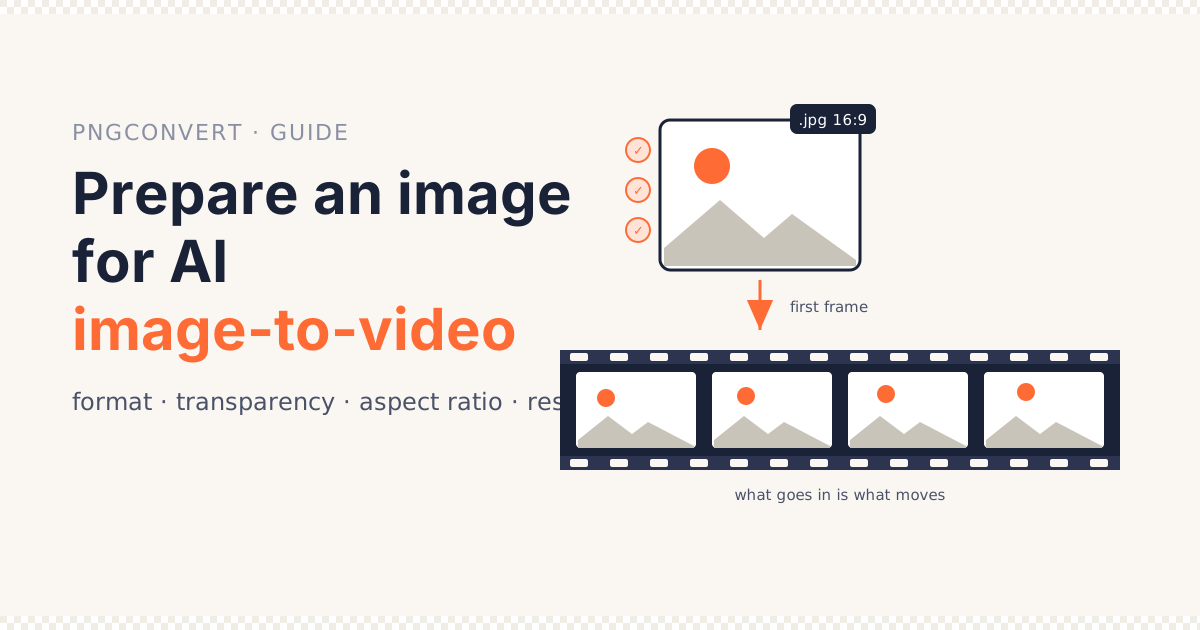
An image-to-video generator does not interpret your picture. It copies it into the first frame, pixel for pixel, and then predicts what the next hundred frames look like. Whatever is wrong with the still — a soft edge, a black box where transparency was, a face squashed to fit 16:9 — is wrong in every frame after it.
The good news is that every one of those problems is fixed before the upload, in a browser, in under a minute, for free. This guide is that minute.
The worked example is Imgveo AI, a free video generator with image-to-video and start-end frame modes; the checks are the same for any generator you use.
What you’ll learn
- Why the still decides the clip, and what a generator actually does with it
- Which formats the upload box takes, and how to convert HEIC, WebP, AVIF and SVG
- Why a transparent PNG comes back with a black box, and how to fill it yourself
- How to crop for 16:9, 9:16 and 1:1 so the app does not crop for you
- How many pixels a 480p draft and a 1080p final need
Quick answer: convert to JPG or PNG (HEIC to JPG for phone photos), fill any transparency with the PNG to JPG converter, crop to the ratio the generator outputs, and make sure the still is at least 1920 pixels wide for 1080p. Then upload.
Why the Still Is the Whole Image-to-Video Clip
Text-to-video starts from nothing and invents a scene. Image-to-video starts from your scene and invents only the motion; that is what makes image-to-video the mode worth preparing for. That is the whole appeal — you control what the clip looks like — and it is also why the still carries all the weight.
Frame one is copied, not described
The model takes your image as the literal first frame. Its job is to produce frames two through N that follow from it plausibly, guided by your prompt. It cannot add detail the still does not have, and it will not remove a flaw the still does have.
What that means for the four checks
Format decides whether the image-to-video upload is accepted at all. Transparency decides what fills the empty area. Aspect ratio decides what gets cropped. Resolution decides how sharp every frame is. Each takes seconds to get right and a credit to get wrong.
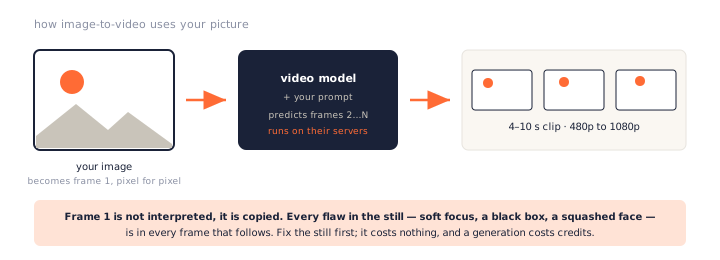
An image-to-video model copies your still into the first frame and predicts the rest. It cannot add detail the still lacks or remove a flaw the still has — so the minute spent fixing the still is the cheapest improvement the clip will ever get.
Image-to-Video Format: JPG or PNG, Converted First
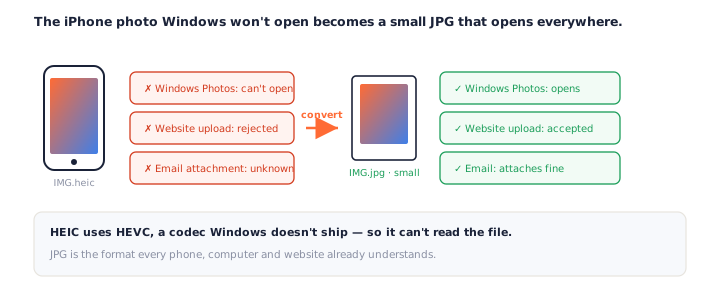
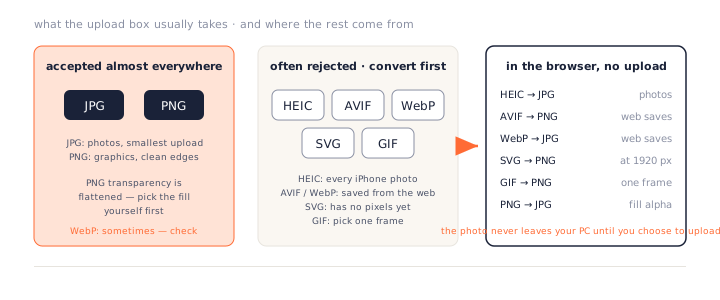
The image-to-video upload box on most generators accepts JPG and PNG. Some take WebP. Almost none take HEIC, AVIF, SVG or GIF — and those are exactly the formats real images arrive in.
The ones that get rejected, and where they come from
HEIC — every iPhone photo
The default camera format on iPhone since 2017. Airdropped or emailed to a PC, it arrives as
.heic, and the upload box greys it out. Run it through the
HEIC to JPG converter — the photo is decoded in your browser, nothing
is uploaded, and the JPG is what the generator wants.
WebP and AVIF — anything saved from a web page
Right-click → Save image on most sites now gives you a .webp or
.avif. The WebP to JPG and
AVIF to PNG converters turn them into something the box accepts.
SVG — a logo or illustration
A vector has no pixels until something draws it. Use the SVG to PNG converter at 1920 pixels wide (or 1080 for portrait) and you get a crisp still at exactly the frame size.
GIF — an animation you want to restart from
Pick the frame you want as the starting point with the GIF to PNG converter; it exports any single frame, or all of them.
JPG or PNG, when you have the choice
JPG for photos
JPG for photographs: smaller upload, and the generator re-encodes everything anyway. PNG for graphics, text and hard edges, where JPG’s compression would smear the lines that the model then animates.
The upload size cap
📝 Note: the image-to-video upload limit varies by service — 10 MB is common. A phone JPG is usually 2–5 MB and fine; a 4000-pixel PNG can be 20 MB and bounce. If it does, the PNG to JPG converter at quality 90 brings it under with no visible loss.
Transparency Becomes a Box
A product shot on a transparent background, a logo, a cut-out character: PNGs with alpha are common starting points, and video cannot hold alpha at all. Something has to fill the empty area, and if you do not choose it, the generator does.
What image-to-video generators do with alpha
Most flatten to black. Some flatten to white. A few leave the alpha channel as noise, which the model then animates into a shimmering backdrop. None of these is what you meant.
Fill it yourself
Run the PNG through the PNG to JPG converter and pick the fill: white for a clean product clip, a colour that matches your brand, or the tone of the scene you describe in the prompt. The converter shows the result before you download, so the box is gone before the upload.
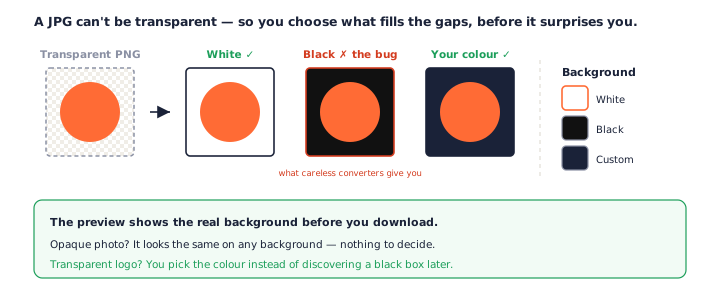
💡 Pro tip: if the subject should sit in a scene rather than on a flat colour, say so in the prompt — but still give the model a flat fill to start from. A clean edge between subject and fill animates far better than a ragged alpha fringe.
Image-to-Video Aspect Ratio: 16:9, 9:16 or 1:1
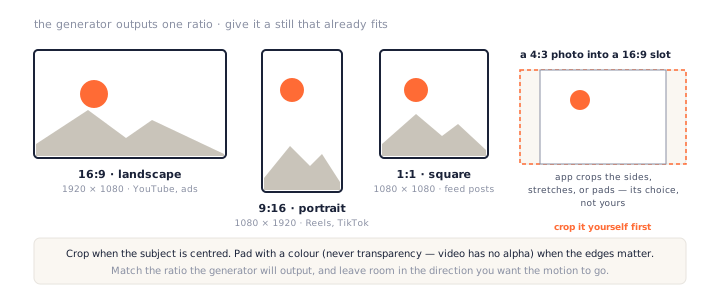
An image-to-video generator outputs one ratio per clip. Give it a still in a different ratio and it will crop, pad or stretch to fit — its choice, not yours.
Match the image-to-video output
- 16:9 (1920 × 1080) for landscape — YouTube, ads, anything on a screen.
- 9:16 (1080 × 1920) for portrait — Reels, Shorts, TikTok.
- 1:1 (1080 × 1080) for square feed posts.
Crop or pad
Crop
Crop when the subject is centred and the edges are expendable. Pad — with a colour, never with transparency — when the whole picture matters. A 4:3 photo into a 16:9 slot loses the top and bottom if cropped, or gains bars at the sides if padded; decide which before the app does.
Pad
Padding keeps every pixel of the original and adds a border in the missing direction. Use a colour taken from the image itself — sample the background — so the bars read as part of the scene, and mention the setting in the prompt so the image-to-video model fills them with something rather than leaving flat stripes.
Leave room for the motion
If the prompt says the car drives left, give the car empty road on the left. A subject jammed against the frame edge has nowhere to go, and the model either stops it or invents what is beyond the edge.
Image-to-Video Resolution: Enough Pixels for the Output
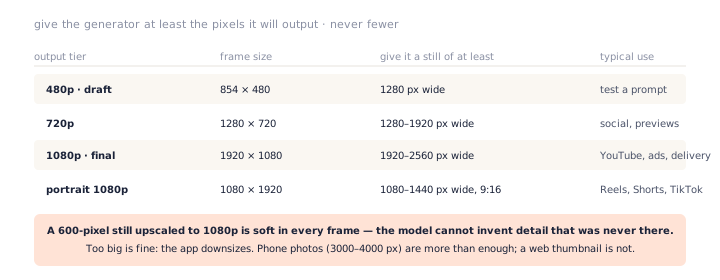
The image-to-video rule is one line: give the generator at least the frame size it will output. Never fewer; more is fine.
What each image-to-video tier needs
A free draft at 480p (854 × 480) is happy with a 1280-pixel still. A 720p clip wants 1280 to 1920. A 1080p final — the tier Imgveo unlocks on paid plans — wants 1920 or more. Portrait flips the numbers: 1080 wide, 1920 tall.
Too small cannot be fixed later
A 600-pixel web thumbnail upscaled to 1080p is soft in the still, so it is soft in every frame. No upscaler, inside the generator or out, invents the detail that was never captured. Go back to the original photo, or rasterise the vector larger.
Too big is harmless
A 4000-pixel phone photo is downsized by the app to its frame size. The only cost is upload time and the size cap — shrink with PNG to WebP only if the service accepts WebP, otherwise JPG at quality 90.
What Makes a Good Image-to-Video First Frame
Format, fill, ratio and pixels are the mechanical image-to-video checks. Three softer ones decide whether the motion looks intended.
One clear subject
An image-to-video model animates what it can identify. A single person, product or vehicle against a simpler background gives it something to move; a crowd or a busy pattern gives it a hundred things to get subtly wrong.
Sharp where it matters
Motion blur or shallow focus in the still becomes permanent. If the subject is soft in frame one, the model treats soft as the truth.
Light and shadow already decided
The still sets the lighting for the whole clip. A flat, evenly lit product shot animates cleanly; a harsh side-light with deep shadows makes the model guess what is in the dark as things move.
Start-End Frame: Two Image-to-Video Stills That Match
Some image-to-video generators, Imgveo among them, take a first still and a last still and generate the motion between — a product turning, a character walking from here to there. It is the most controllable mode, and the one where mismatched stills cost the most.
The two must agree on everything
Same aspect ratio, same resolution, same format, same background fill. If the start is a 4000-pixel JPG and the end is a 600-pixel PNG with transparency, the clip starts sharp on a scene and ends soft on a black box.
Move the subject, not the camera
Keep the framing identical and change only the subject’s position or pose. A shift in camera angle between the two stills forces the model to invent a camera move, and it rarely invents the one you wanted.
Convert both in one batch
Every converter on this site takes multiple files at once. Drop both stills on the same tool with the same settings and they come out matched — same fill, same format — with nothing to drift.
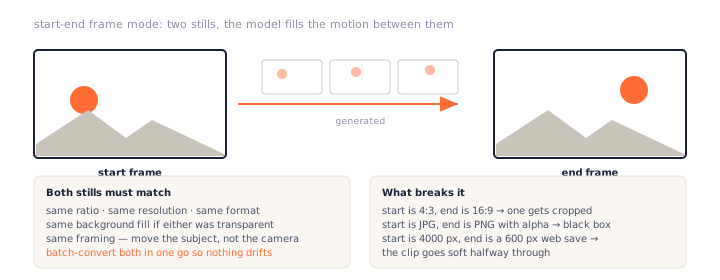
For start-end frame mode, the two stills must share ratio, resolution, format and background fill, and differ only in where the subject is. Batch-convert them together so they cannot drift apart.
The 60-Second Image-to-Video Checklist
- Convert to JPG or PNG. HEIC from a phone → HEIC to JPG. WebP or AVIF saved from the web → WebP to JPG or AVIF to PNG. A logo as SVG → SVG to PNG at 1920 pixels.
- Fill any transparency. Video has no alpha channel. Run a transparent PNG through PNG to JPG and choose the fill colour, so the box behind the subject is one you picked rather than black.
- Crop to the output ratio, at the output size or larger. 16:9 at 1920 × 1080 for landscape, 9:16 at 1080 × 1920 for portrait, 1:1 at 1080 for feeds. Crop in any editor; the converters here keep whatever size you give them.
A worked example: phone photo to a four-second clip
What arrives
A friend AirDrops a photo of their new bike leaning against a wall: IMG_4471.HEIC,
4032 × 3024, 2.8 MB. The plan is a short image-to-video clip of the bike rolling forward for a
story post.
Format
The upload box does not take HEIC. Drop it on HEIC to JPG; it comes out as a 1.9 MB JPG at the same 4032 × 3024, decoded in the browser.
Ratio
A story is 9:16, and the photo is 4:3 landscape. Crop a portrait slice around the bike, leaving empty ground in front of the wheel for the roll — the image-to-video model needs somewhere to send it. The crop is 1500 × 2667, which is 9:16 and well over the 1080 × 1920 the clip needs.
Fill and pixels
A JPG has no alpha, so there is nothing to fill. 1500 wide beats the 1080 minimum for portrait 1080p and is far above what a 480p draft needs. Four checks, one conversion, one crop.
Then upload. On Imgveo the free tier runs image-to-video at 480p for 4 seconds with 20 credits and no card, which is the right place to test a still before committing it to a 1080p, 10-second generation on a paid plan.
Frequently Asked Questions
What image format do AI video generators accept?
JPG and PNG, almost universally; WebP sometimes. HEIC (every iPhone photo), AVIF, SVG and GIF are commonly rejected at the upload box. Convert them first — HEIC to JPG for phone photos is the one most people need — and the upload goes through.
What size should an image be for image-to-video?
At least the frame size the generator will output, and larger is fine. For 1080p that means a still 1920 pixels wide or more; for a free 480p draft, 1280 is plenty. A phone photo at 3000–4000 pixels is ideal; a 600-pixel web thumbnail will be soft in every frame.
What aspect ratio should the image be?
The ratio the generator outputs: 16:9 for landscape (YouTube, ads), 9:16 for portrait (Reels, Shorts, TikTok), 1:1 for square feeds. Crop the still to that ratio yourself; otherwise the app crops or pads it its own way, and the edge you cared about may be the one that goes.
Can I use a PNG with a transparent background for AI video?
You can upload it, but video has no transparency, so the empty area is filled — usually with black, sometimes white, occasionally noise. Fill it yourself first with the PNG to JPG converter, picking a colour that matches the scene, and the model animates a clean backdrop instead of a box.
Does a higher-resolution image make a better AI video?
Up to the output size, yes: detail that is in the still survives into the frames. Beyond that, no — the generator downsizes to its frame size, and a 6000-pixel still gives the same result as a 2000-pixel one. Sharpness and composition matter more than raw pixel count past that point.
What is start-end frame mode, and how should the two images match?
You give a first still and a last still; the model generates the motion between them. Both must share the same ratio, resolution, format and background fill, and the same framing — move the subject between the two, not the camera. Imgveo offers this mode on the free tier at 480p, so a mismatched pair costs a credit to discover.
Which AI video generator can I try for free with an image?
Imgveo AI gives 20 credits with no card and runs all three modes — text-to-video, image-to-video and start-end frame — at 480p and 4 seconds on the free tier; paid plans unlock 720p to 1080p and 5–10 second clips. Prepare the still as above before spending the first credit.
Next Steps
Take the photo you were about to upload and run the four checks against it — format, fill, ratio, pixels. Most stills fail one, and it is almost always the format or the fill, both of which take one drop on a converter.
The tools for that: HEIC to JPG, WebP to JPG, PNG to JPG and SVG to PNG. Then try the image-to-video generator on Imgveo with the fixed still and a free credit. More walkthroughs are on the PNGConvert guides page.