How to Convert JPG to ICO in 3 Steps
A photo and an icon want opposite things. One is big, rectangular and full of detail; the other is tiny, square, and has to read at a glance. Converting JPG to ICO is mostly about handling that gap well.
The steps below are the same whether your file is named .jpg or
.jpeg — they are the same format, so JPEG to ICO and JPG to ICO are the same
conversion.
- Add your JPG
Drag a JPEG in, click to browse, or paste one with
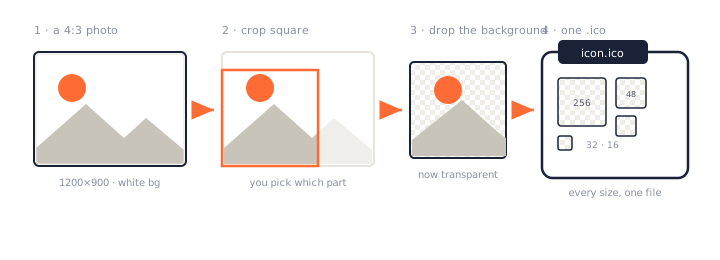
Ctrl+V. There is no file size limit, so a full-resolution photo straight off a phone is fine. PNG, WebP, GIF and BMP work too. - Frame it and clean it up
Icons are square and photos are not, so pick which part to keep — the grid moves the crop to wherever your subject is. If the photo sits on a plain background, switch on Remove it and the background drops out. The previews on the right show the real 16, 32 and 48 pixel result as you go.
- Download your ICO
Click Convert to ICO and every size you ticked is bundled into one icon file. The whole JPG to ICO conversion runs on your own device — nothing is uploaded, and there is no daily limit.
JPG Has No Transparency — What That Means for Your Icon
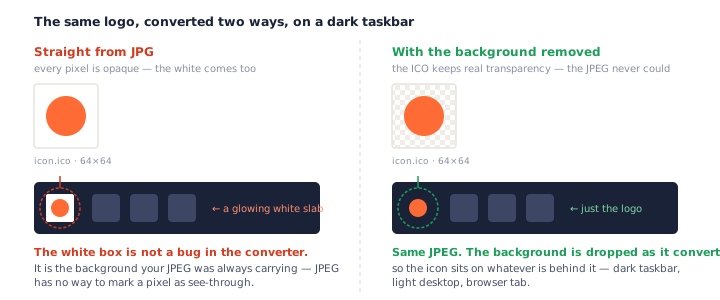
A JPEG cannot store transparency. Every pixel is opaque, so whatever sat behind your subject — almost always white — is baked into the image and travels with it into the icon.
This is the single biggest difference between converting JPG to ICO and converting from PNG, and it catches almost everyone.
Why your icon gets a white box
An ICO can hold full transparency. Your JPEG cannot supply any. So a plain JPG to ICO conversion faithfully keeps the white rectangle your logo was sitting on, and Windows dutifully draws it.
On a light background nobody notices. Put that same icon on a dark taskbar, a dark browser tab, or a dark desktop, and it turns into a glowing white slab with your logo marooned in the middle.
Removing the background as you convert
Most JPG to ICO converters cannot help here. The usual advice is a three-stop detour: run the JPEG through a background remover, save a PNG, then bring the PNG back to an icon converter.
This page does it in the same step. Switch on Remove it, and the background colour is knocked out with a soft edge before anything is resized. Click the photo to pick a different colour, and widen Tolerance if the background is not perfectly even.
When it works well
Flat, even backgrounds: a logo scanned on white, a product shot in a lightbox, a screenshot, a graphic exported to JPEG by mistake. These are the majority of JPEGs people turn into icons, which is why a JPG to ICO converter that cannot do this leaves most of the job undone.
When it will not
Real photographic backgrounds — a street, a room, a sky with clouds. There is no single colour to remove, and no colour-based tool can separate a subject from a scene. Crop tighter instead, or start from artwork.
There is a subtler catch worth knowing about. Removing a colour removes it everywhere, not just around the outside. A white logo on white — a tick knocked out of a coloured circle, white text inside a badge — loses those parts too, because they are the same colour as the background and nothing in the file says otherwise. Watch the 16px preview: if the middle of your mark starts disappearing, that is what happened. Lower the tolerance, or leave the background alone and crop instead.
When to use PNG to ICO instead
If you still have the original PNG, use it. It is lossless, it already has a transparent background, and there is nothing to remove or guess at. Our PNG to ICO converter is the right tool in that case. Convert JPG to ICO when the JPEG is genuinely all you have.
Turning a Photo into an Icon: Cropping and Composition
Here is a problem no JPG to ICO converter talks about, even though it affects every photo ever converted.
Every ICO entry must be square
Icons are square. Photos essentially never are — phones shoot 4:3, cameras shoot 3:2. So every JPG to ICO conversion has to resolve that, and there are only two honest options: crop the photo, or pad it.
Crop or pad — and what it costs you
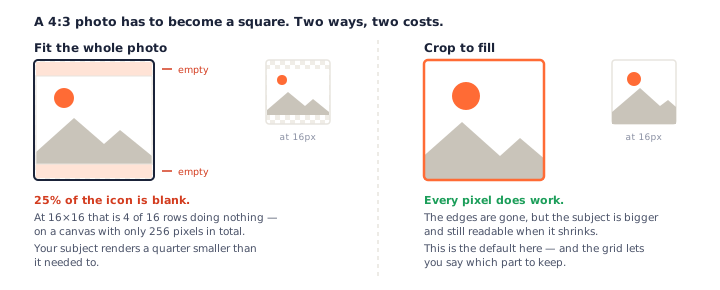
Padding keeps the whole photo and fills the gap with empty space. Cropping fills the square and throws away the edges. Neither is free, but they fail very differently — and most JPG to ICO converters pick one for you without saying which.
The 25% you lose to padding
Pad a 4:3 photo into a square and exactly 25% of the icon is blank. At 16×16 that is four of sixteen rows sitting empty — on a canvas that only has 256 pixels to begin with. Your subject gets the remaining 192 and is rendered a quarter smaller than it needed to be.
That is why this page crops by default, and why the grid lets you say which part to keep. A centre crop is a decent guess, not a rule — if your subject is off to one side, move the crop to it.
What survives at 16×16
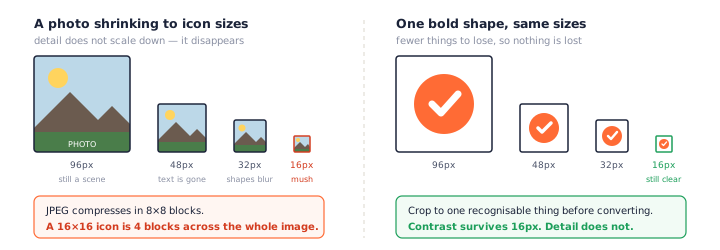
Very little, and it is worth being blunt about that. One bold silhouette with high contrast survives. A face that fills the frame survives, barely. A landscape, a group shot, or anything with fine text does not — it becomes texture.
This is the part a JPG to ICO converter cannot solve for you. Cropping decides whether there is one clear subject at all, and no amount of processing invents one after the fact. It is also why the previews on this page are shown at true size rather than blown up: an enlarged preview would hide exactly the problem you need to see.
Why JPG Icons Look Blurry at Small Sizes
If you have converted JPG to ICO before and the result looked mushy, it was probably not the converter's fault. Two separate things are working against you.
Lossy compression meets downsampling
JPEG saves space by discarding detail your eye will not miss at full size. That is a good trade for a photo you view at 100%. It is a bad starting point for an image about to be crushed into a 16-pixel square, where every remaining pixel counts — which is why JPEG to ICO is a harder conversion than PNG to ICO, whatever tool you use.
Why JPEG artifacts get worse, not better, when shrunk
JPEG works in 8×8 pixel blocks. A 16×16 icon is four blocks across the entire image. Whatever softness or ringing the compressor left around your logo's edges is no longer a subtle artifact at that scale — it is a meaningful fraction of the icon.
How much source resolution you actually need
At least 256×256 after cropping. If you crop a 1200×900 photo down to its centre square you still have 900×900 to work with, which is plenty. If you crop a 300×200 thumbnail, you have 200×200 and the 256 entry will already be soft. This page warns you when the source is too small, rather than letting you find out afterwards.
What sharpening can and cannot fix
Shrinking blurs edges, and a light unsharp pass buys some of that crispness back — which is why Sharpen small sizes is on by default for 16 to 48 pixels. It lifts edge contrast. It cannot restore detail JPEG already discarded, and it will not rescue a photo that was too busy to be an icon.
Which ICO Sizes to Generate from a JPG
The size list matters a little less with a photo source, because the small entries are doing the heavy lifting.
For favicons
Keep 16, 32 and 48. Browsers pick whichever fits, and 16 is the one people actually see — so judge your JPG to ICO result on that preview, not the big one.
For Windows app and shortcut icons
Add 256. It is the entry Explorer uses in large-icon view, and it costs a few kilobytes because it is PNG-compressed inside the ICO container.
Sizes worth skipping for photo sources
If your JPEG is small, there is no point generating a 256 entry from a 200-pixel source — you are storing an upscale. Convert JPG to ICO at the sizes your photo can genuinely fill.
JPG vs PNG vs ICO: Which Source Format to Use
| JPG / JPEG | PNG | ICO | |
|---|---|---|---|
| Transparency | None | Full alpha | Full alpha |
| Compression | Lossy | Lossless | Lossless entries |
| Holds many sizes | No | No | Yes |
| Typical content | Photos | Logos, artwork | Finished icons |
| Good icon source | Only if it is all you have | Best | — |
Start from PNG when you can
Nothing to remove, nothing lost to compression. If the artwork exists as a PNG, the PNG to ICO converter skips both problems this page spends its time solving.
When JPG is all you have
Which is often. Photos, downloads, screenshots, a logo whose source file vanished years ago — these are JPEGs, and converting JPG to ICO is the only route to an icon.
One thing that trips people up: JPG and JPEG are the same format. The three-letter extension is a leftover from when file names could not hold four. Searching for a JPEG to ICO converter and a JPG to ICO converter finds the same tool, and this page handles both.
PNGConvert vs Other JPG to ICO Converters
| PNGConvert | Typical converters | |
|---|---|---|
| Conversion happens | In your browser | On their servers |
| Remove the background | Built in | Use a second tool first |
| Choose what to crop | Nine-cell grid | Automatic, or not at all |
| See it at 16px first | Yes, live | No |
| Warns on low resolution | Yes | No |
| File size limit | None | Often 4–5 MB |
| EXIF and GPS | Never leave your device | Uploaded with the photo |
Converters that leave the white box
Most of them. Several JPG to ICO converters state outright that a JPEG cannot be transparent and stop there, which is true but not helpful — the background can still be removed, just not by JPEG itself. The usual workaround they suggest is a three-tool detour.
Converters that crop without asking
Others quietly centre-crop your photo, or pad it, and never mention which. If your subject was not dead centre, you find out after downloading. A JPG to ICO converter deciding your composition silently is the difference between a usable icon and a beheaded one.
The 5 MB problem with phone photos
Several popular converters cap uploads at 4–5 MB. A photo straight off a modern phone is routinely 8–15 MB, so the first thing you have to do is shrink the file — before the tool that was going to shrink it for you. Nothing is uploaded here, so there is no cap to hit and no queue to wait in, however many JPEG files you convert.
How to Convert JPG to ICO on Windows
Why Paint cannot save an ICO
Paint opens JPEGs happily and offers PNG, BMP, GIF and TIFF when saving — but not ICO. It has no idea how to build an icon container, let alone one holding several sizes.
Why renaming .jpg to .ico never works
The bytes inside are still a JPEG. An ICO starts with a directory listing every image it holds; a renamed JPEG has no such directory, so Windows shows a blank icon.
Doing it in the browser instead
Drop the photo on this page and it is done — no install, no admin rights, and JPG to ICO works the same on Windows 10 and Windows 11. This is also the only method here that shows you the 16×16 result before you commit.
The desktop alternatives are IrfanView, GIMP or ImageMagick. All three can convert JPEG to ICO, and all three are a much longer road than dropping a file on a page — GIMP in particular needs you to know that icon export hides inside File → Export As with the extension typed by hand.
We ran all five routes on the same file — this page, GIMP, ImageMagick, IrfanView and an upload site — and wrote up what each one produced, plus how to apply the icon and fix it when Windows puts the old one back: How to Convert JPG to ICO on Windows 11 and 10: 5 Methods Tested.
Frequently Asked Questions
Why does my JPG icon have a white background?
Because JPEG cannot store transparency at all. Every pixel in a JPG is opaque, so whatever was behind your logo — usually white — becomes part of the image and stays there when you convert JPG to ICO. On a dark taskbar it shows up as a bright box around your icon. This converter can drop that background for you as it converts, which is why the icon comes out with real transparency instead.
Can I remove the background when converting JPG to ICO?
Yes, and it happens in one step here rather than three. Switch on Remove it, and the colour shown in the swatch is knocked out with a soft edge; click anywhere on the photo to pick a different colour, and use Tolerance if the background is uneven. It works best on flat backgrounds — a studio shot on white, a scanned logo, a screenshot. One caveat: it removes that colour everywhere, so white details inside your logo go too. It is off by default for exactly that reason, and the 16px preview shows you immediately if it has taken too much.
Why does my icon look blurry at 16×16?
Two things stack up. JPEG throws away fine detail when it compresses, and a 16×16 icon has only 256 pixels to work with in total — a photo simply has more going on than that can hold. Start from the largest JPEG you have, crop tight to one recognisable subject rather than the whole scene, and leave Sharpen small sizes on. The previews show you the truth before you download.
Can I turn a photo into an icon?
You can, but crop it hard first. A landscape or a group photo turns to mush at 16 pixels because there is nothing for the eye to lock onto. What survives is one bold shape with strong contrast — a face filling the frame, a single object, a letter. Use the grid to pull the crop onto that subject rather than converting the whole picture.
What size should my JPEG be before I convert it?
At least 256×256 after cropping, and larger is better. Scaling down looks great; scaling up cannot invent detail that was never captured. If your source is under 256 pixels this page warns you before you convert JPG to ICO, because at that point no converter can give you a sharp 256×256 icon — the information is simply not in the file.
Should I use JPG or PNG to make an icon?
PNG, whenever you have the choice. It is lossless and it supports transparency, which is exactly what an icon needs. Use our PNG to ICO converter if you have the original artwork. Convert JPG to ICO when a JPEG is all that is left — a photo, a download, an old logo whose source file is long gone.
How do I convert JPG to ICO on Windows 10 or 11?
Windows has no built-in way to do it. Paint opens a JPEG but cannot save an ICO, and renaming the extension produces a file Windows refuses to display. A browser tool like this one is the fastest route to convert JPG to ICO, and it works the same on Windows 10, Windows 11, macOS and Linux. IrfanView and GIMP can do JPEG to ICO too, if you would rather install something.
Is it free, and do my files get uploaded?
Free with no limits, no account, and no watermark. Nothing is uploaded either — the conversion runs inside your browser, so it keeps working offline. That matters more for photos than for artwork: JPEGs carry EXIF metadata that can include the location the picture was taken. Since your file never leaves the device, neither does any of that. See our privacy policy.
More Free Converter Tools
The JPG to ICO converter is one of a growing family of free, in-browser tools on pngconvert.net — same privacy promise, no accounts, no uploads:
Turn PNG images into multi-size Windows icons and favicons.
SVG to ICODraw a vector at every icon size, and see what it loses first.
WebP to ICOEvery size in one icon — and pick the frame if it is animated.
ICO to PNGExtract every size from an ICO file as separate PNG images.
WebP to PNGUnpack WebP to a transparent PNG — one frame, every frame, or an APNG.
SVG to PNGRasterize a vector to PNG at any size — 1x, 2x, 3x or a custom width.
AVIF to PNGTurn an AVIF your software won’t open into a PNG that works everywhere.
HEIC to PNGConvert iPhone HEIC photos to PNG in your browser — nothing uploaded.
GIF to PNGOne frame, every frame as a zip, or an animated PNG — you choose.
JPG to PNGLossless PNG from a JPG — and a flat background keyed to transparency.
PNG to WebPShrink PNG to WebP and watch the size drop live — lossy or lossless.
PNG to GIFA GIF encoded in your browser — one still, or several PNGs as one animation.
PNG to JPGConvert PNG to JPG — pick what fills transparent areas, see the size drop.
WebP to JPGConvert WebP to a JPG that opens anywhere — you pick what fills the transparency.
HEIC to JPGConvert iPhone HEIC photos to small, shareable JPGs — nothing uploaded.
Favicon GeneratorOne logo in, the favicon files you actually need out.