How to Convert JPG to ICO on Windows 11 and 10: 5 Methods Tested
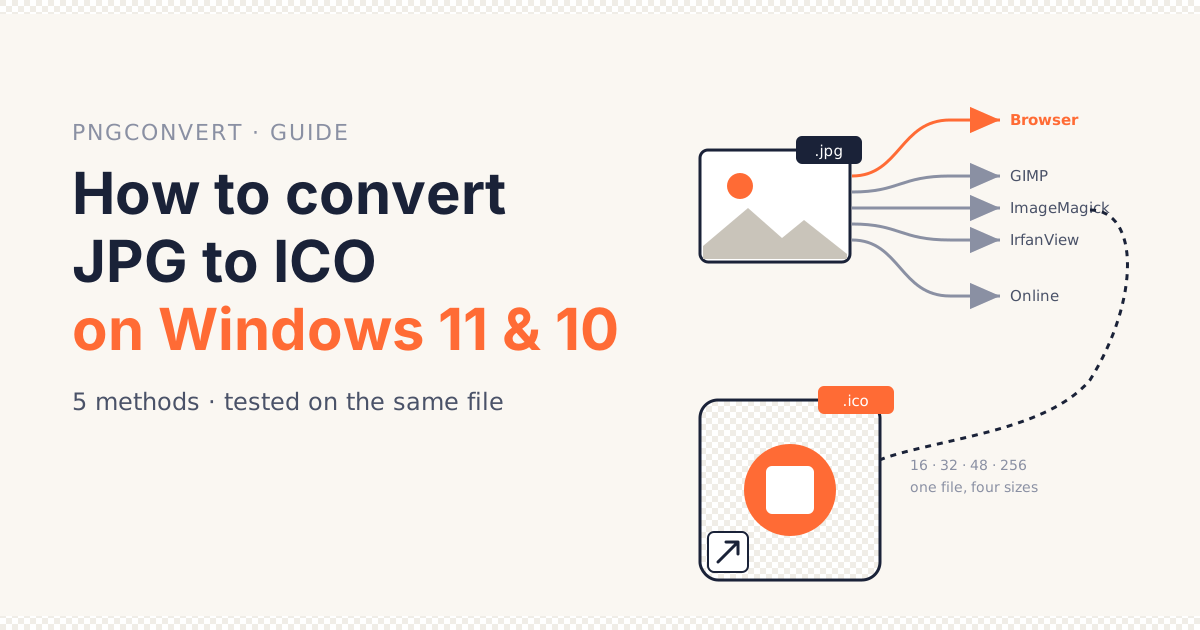
Windows draws the same icon at 16, 24, 32, 48 and 256 pixels depending on where it appears —
the taskbar, the desktop, an Explorer list — and expects all of those sizes packed into one
.ico file (Microsoft, Icons design guide).
A JPG is the opposite of that: one image, one size, no transparency. So to convert JPG to ICO on Windows you need something that rewrites the file, and Windows 11 does not ship with anything that can.
This guide walks through the five ways that actually work, run on the same JPG so you can compare what each one produces. Then it covers the part most guides skip: putting the icon on a shortcut or folder, and fixing it when Windows quietly puts the old one back.
What you’ll learn
- Why renaming
.jpgto.icoand “Save As” in Paint both fail - How to convert JPG to ICO in a browser, in GIMP, in ImageMagick, in IrfanView, and online
- What each method produced from one 1024 × 1024 test file — sizes, transparency, bytes
- How to apply the icon to a shortcut, folder or drive on Windows 11 and Windows 10
- The three reasons a custom icon reverts, and the fix for each
Quick answer: Windows has no built-in JPG to ICO converter. The fastest
route is a browser converter: drop the JPG, keep 16 / 32 / 48 / 256 checked, download the
.ico. Then right-click the shortcut → Properties → Shortcut → Change Icon →
Browse to the file.
Why Windows Can’t Convert JPG to ICO on Its Own
Every few weeks someone asks how to convert JPG to ICO on the Microsoft Community forums, and the replies suggest four different programs. The reason there is no single answer is that Windows itself has never included one.
Paint and Photos have no ICO option
Open a JPG in Windows 11 Paint and look at Save As: the list is PNG, JPEG, BMP, GIF and TIFF. ICO is not there, and it is not in the Photos app either.
Paint 3D used to be the workaround people reached for. Microsoft removed it from the Store in November 2024, so on a fresh Windows 11 install it is gone too.
Renaming .jpg to .ico does not work
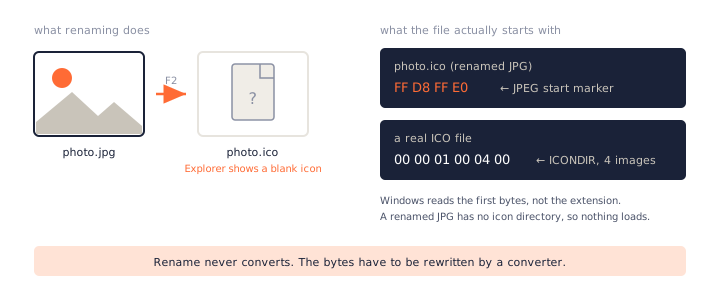
The oldest trick on the forums is to press F2 and change the extension. Explorer
then shows a blank icon, and the Change Icon dialog says the file contains no icons.
That is because Windows reads the first bytes of the file, not its name — and nothing has
converted the JPG to ICO. A JPG starts with the
JPEG marker FF D8; an ICO starts with a small directory that says how many images
are inside and where each one sits. Renaming changes neither.
What an ICO file actually is
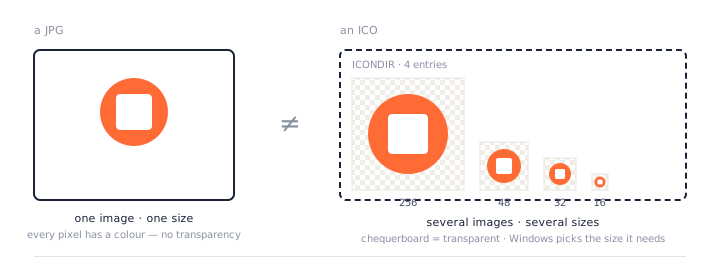
An ICO file is a container that stores several sizes of the same icon — typically 16, 32, 48 and 256 pixels — so Windows can pick the right one for the taskbar, desktop or Explorer without scaling. A JPG holds exactly one image and no transparency.
Since Windows Vista the 256-pixel entry is normally stored as compressed PNG data inside the ICO, while smaller entries are often plain bitmaps. That detail decides file size later, and it is where the five methods differ most.
📖 Further reading: the ICO to PNG page explains the container format in more depth, and lets you pull the sizes back out of any icon.
Prepare the JPG Before You Convert
Whichever JPG to ICO method you pick, three properties of the JPG decide how good the icon will be. It is worth thirty seconds on each before you convert.
One shortcut before anything else: if the artwork also exists in another format, start from that. The PNG to ICO converter keeps transparency, the SVG to ICO converter renders a vector crisp at every size, and the WebP to ICO converter handles the format phones now save in.
Make it square — crop or pad
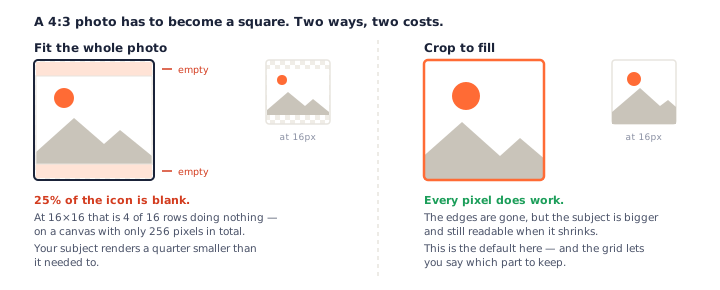
Every entry in an ICO must be square. A 4:3 photo therefore has to lose its edges (crop) or gain empty margins (pad), and a converter that does not ask will simply squash it.
Crop when the subject is in the middle. Pad when the whole picture matters, and accept that the subject will be smaller at 16 pixels.
Start from at least 512 × 512
The largest icon size is 256, and downsampling from twice that gives the resampler enough pixels to average out JPEG compression blocks. Start from a 200-pixel JPG and those blocks become visible noise at 16 pixels.
A phone photo is far larger than a JPG to ICO conversion needs, which is fine. Only the square you keep counts.
Decide what happens to the background
Why JPG icons get a white box
JPG cannot store “nothing”. Every pixel has a colour, so the background around a logo is a solid rectangle, and a straight JPG to ICO conversion keeps that rectangle.
On the light Explorer background it is invisible. On a dark taskbar it is a bright white box with your logo in the middle.
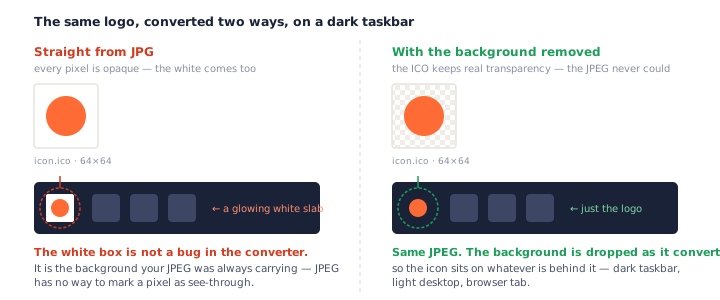
Solid background: key it out during conversion
If the background is one flat colour, a converter with a background remover can drop it as it converts JPG to ICO. Method 1 below does this; Method 2 can with a magic-wand selection.
Busy background: go through PNG first
A photo of a person against a room cannot be keyed out — there is no single colour to remove. Cut the subject out in an editor, save it as PNG, and convert the PNG to ICO instead. The JPG to PNG converter covers the flat-colour case in one step.
💡 Pro tip: test the finished icon on a dark taskbar, not just the desktop. Windows 11 defaults to a dark taskbar, and that is where a leftover white box shows first.
Method 1: Convert JPG to ICO in Your Browser (No Upload)
This is the JPG to ICO method we recommend first, and it is our own tool, so weigh that as you read. The reason it comes first is that it needs no install, produces every size in one file, and never sends the photo anywhere.
Step by step
- Open the converter and drop the JPG. Go to the JPG to ICO converter and drag the photo onto the page, click to browse, or paste it with
Ctrl+V. Nothing is uploaded — the file is decoded inside the browser tab. - Pick sizes and remove the background. Leave the default 16, 32, 48 and 256 checked for a Windows icon. If the photo sits on a plain background, switch on Remove background and click the colour to key it out.
- Download the .ico. Click Convert, then Download. You get one multi-size ICO named after the JPG, ready for the Change Icon dialog.
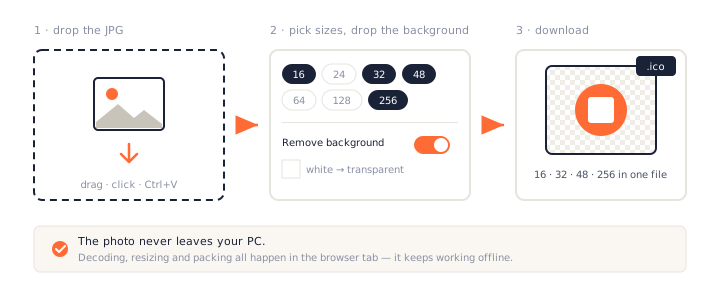
What you get
One .ico with four entries, each stored as compressed PNG at 32 bits per pixel —
the JPG to ICO output Windows expects.
From our 1024 × 1024 test JPG that came to 16.5 KB, and with the white
background keyed out, 15.9 KB.
The conversion itself took 23 milliseconds in Chrome. There is no queue because there is no server.
Why this is the default recommendation
It is the only method here that handles all three preparation steps for you: it crops or pads to a square, it resamples in stages so 16 pixels stays sharp, and it can remove a flat background. It works on Windows 10 and 11 alike, in Chrome, Edge, Firefox or Safari.
The honest limitation: it is a web page. If your policy forbids running unknown JavaScript, or you are working on a machine with no browser, use Method 2 or 3.
Method 2: Convert JPG to ICO with GIMP (Free, Offline, Multi-Size)
GIMP is the free editor most forum answers point to for JPG to ICO, and it can write a proper multi-size ICO. The catch is that it treats each layer as one icon entry, so a multi-size icon is a multi-layer image you build by hand.
Step by step
Open the JPG and crop to a square
File → Open, then use the Crop tool with Fixed aspect ratio set to
1:1. Press Enter to apply the crop.
Scale to 256 × 256, then duplicate layers at 48, 32 and 16
Image → Scale Image to 256 × 256. Then, three times: Layer → Duplicate Layer, followed by Layer → Scale Layer to 48, 32 and 16.
Name the layers after their sizes. The export dialog lists them in order, and it is easy to lose track.
Export as .ico and set each layer to 32 bpp
File → Export As, type a name ending in .ico, and click Export.
In the dialog that follows, set every entry to 32 bpp, 8-bit alpha, no palette and
tick Compressed (PNG) for the 256 entry.
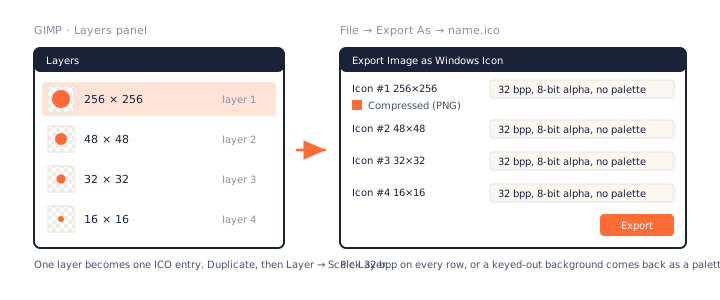
The catch: one layer per size
Skip the duplicating and the JPG to ICO export gives you a one-entry ICO, which Windows will scale badly on the taskbar. In our headless test GIMP 3.2 wrote a four-entry file of 15.8 KB, but its default settings stored the 16, 32 and 48 entries as 8-bit palette bitmaps — fine for a flat logo, visibly banded on a photo unless you pick 32 bpp in the dialog.
💡 Pro tip: for transparency, first run Layer → Transparency → Add
Alpha Channel, then select the background with the Fuzzy Select tool and press
Delete. Do this before duplicating, so all four layers inherit it.
Method 3: JPG to ICO with ImageMagick (Best for Batch)
If you convert JPG to ICO more than once a week, or have a folder of them, ImageMagick is the fastest method on this page once it is installed. Get it from imagemagick.org and tick “Add to PATH” in the installer.
Install and run one command
magick photo.jpg -resize 256x256^ -gravity center -extent 256x256 -define icon:auto-resize=256,48,32,16 photo.ico
The -resize … -extent pair fills a 256-pixel square from the centre, so a 4:3
photo is cropped rather than squashed. The icon:auto-resize define is what makes
the output multi-size: one entry per listed size, largest first (ImageMagick formats reference).
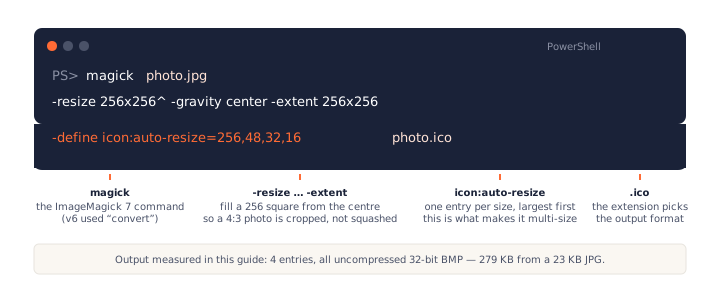
Batch a whole folder in PowerShell
Get-ChildItem *.jpg | ForEach-Object {
  magick $_ -resize 256x256^ -gravity center -extent 256x256 `
    -define icon:auto-resize=256,48,32,16 "$($_.BaseName).ico"
}
Fifty JPG to ICO conversions take a few seconds. Every output has the same four sizes, which is exactly what you want for a set of shortcut icons.
When to skip it
ImageMagick 7.1.2 wrote all four entries as uncompressed 32-bit bitmaps: 279 KB from a 23 KB JPG, about 17 times the size of the browser output. Windows does not care, but if the icon is going into an installer or a repo, that adds up.
It also cannot remove a background from a JPG in any useful way. -transparent white
keys pure white only, and JPEG compression means the background is never pure white.
Method 4: JPG to ICO in IrfanView and Paint.NET
Both are popular free Windows programs that can save a JPG to ICO file, and both are worth knowing about mainly for what they do not do.
IrfanView: fast, but one size per file
Open the JPG, Image → Resize to 256 × 256, then File → Save As and choose ICO. IrfanView writes a single entry at whatever size the image is.
Feed it the 1024-pixel original and it will happily write a 1024 × 1024 “icon” of 3.1 MB that Windows cannot use — ICO tops out at 256. Resized to 256 first, the file was 200 KB, uncompressed, one size. Taskbar rendering of a single 256 entry is noticeably soft.
Paint.NET needs a plugin
Out of the box Paint.NET has no ICO format at all. The community Icon/Cursor file-type plugin adds it, and with the plugin installed it can write multiple sizes from one image — but that is an extra download and an extra restart.
📝 Note: both programs let you type .ico as the extension and
save, which is why forum posts recommend them. Neither generates the size ladder for you —
that is the difference between them and Methods 1 and 3.
Method 5: Online JPG to ICO Converters (Upload)
CloudConvert, Convertio, FreeConvert and a dozen other JPG to ICO sites will convert the file by uploading it to their servers and handing back a download. They work, and for a public logo that is perfectly reasonable.
When they are fine
Public artwork, a company logo, a screenshot of a game — anything you would post online anyway. If you already have an account with one for other formats, there is no reason to leave it.
What to check before you upload
- File size limit. Free tiers commonly stop at 5–10 MB; a phone photo can be 12 MB.
- Sizes offered. Some produce a single 32 or 64 entry unless you find an advanced menu.
- Background handling. Most keep the white rectangle without warning.
- Retention. Read how long the upload is kept; “deleted after 24 hours” is typical.
We did not include a specific online service in the measured table below, because the result depends on which one you pick and which options it exposes. The rows above are the questions to ask.
All 5 JPG to ICO Methods Compared on the Same File
The JPG to ICO test file was a 1024 × 1024 JPG of a logo on a white background, 23 KB on disk. Each method was asked for the standard Windows set: 16, 32, 48 and 256 pixels.
| Method | Sizes in one file | Transparency from JPG | Output size | Steps | Offline | Cost |
|---|---|---|---|---|---|---|
| 1 · Browser (PNGConvert) | 4 (PNG-compressed) | Flat colour, built in | 16.5 KB | 3 | Yes, after first load | Free |
| 2 · GIMP 3.2 | 4, one layer each | Manual selection | 15.8 KB (8-bit small entries) | 9 | Yes | Free |
| 3 · ImageMagick 7.1.2 | 4 (uncompressed) | Pure colour only | 279 KB | 1 command | Yes | Free |
| 4 · IrfanView 4.75 | 1 | No | 200 KB at 256 px | 4 | Yes | Free for personal use |
| 5 · Online upload | Varies | Rarely | Not measured | 3–5 | No | Free tier, limits |
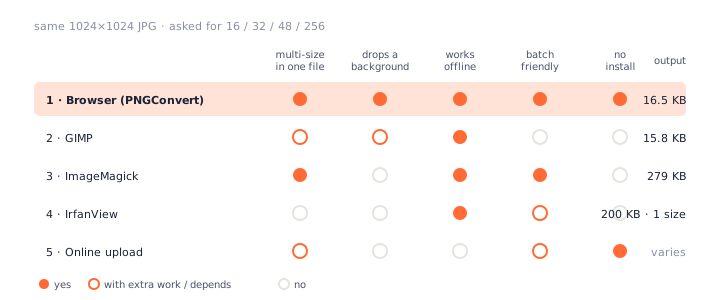
Of the five methods, only the browser converter and ImageMagick produce a multi-size ICO in one pass. GIMP can, but only if you build one layer per size by hand; IrfanView cannot.
The size gap is the surprise of the JPG to ICO comparison. Three of the outputs contain the same four images, yet ImageMagick’s is seventeen times larger than the browser’s, because it stores every entry as a raw bitmap. Windows renders all of them the same.
How to Apply the ICO in Windows 11 and 10
Converting JPG to ICO is half the job. The .ico does nothing until a shortcut, folder or drive
points at it — and where you keep the file matters more than most guides admit.
Change a shortcut icon
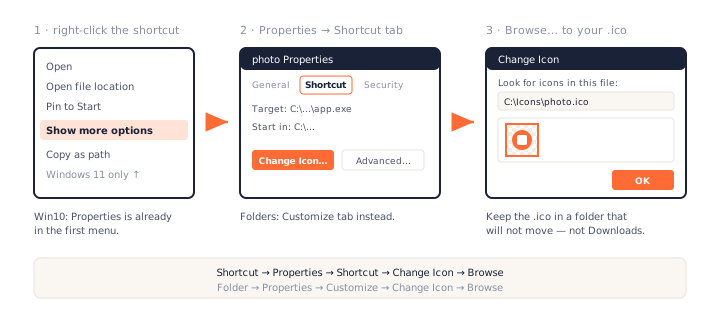
Right-click the shortcut you want the JPG to ICO result on. On Windows 11 click Show more options (or press
Shift+F10); on Windows 10 the full menu appears at once.
Choose Properties → Shortcut tab → Change Icon → Browse, pick your
.ico, and click OK twice. The new icon appears immediately.
Change a folder icon
Same path, different tab, same JPG to ICO file: Properties → Customize → Change Icon →
Browse.
Windows writes a hidden desktop.ini inside the folder that records the icon’s
path.
Change a drive or app icon
Drives
A USB stick can carry an autorun.inf with icon=drive.ico in the root,
and Explorer will show it. Windows 10 and 11 still honour the icon line even though autorun
execution has been disabled since Windows 7.
Apps
You cannot change the icon baked into an .exe without rebuilding it. What you can
change is the shortcut that launches it — so create a shortcut and change that.
Where to keep the .ico file
Windows stores the path to the icon, not a copy of it. Put the file in
C:\Icons\ or another folder that will never move, then browse to it from there.
Do not leave it in Downloads. Clearing Downloads is the single most common reason a custom icon vanishes a month later.
Troubleshooting: Icon Reverted, Blurry, or Boxed
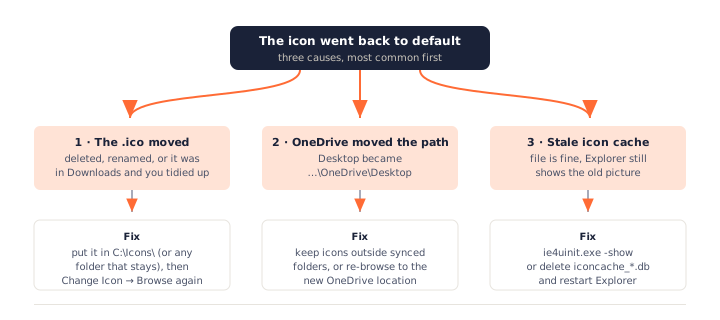
The icon changed back to default
You moved or deleted the .ico
The most likely cause by far, and nothing to do with the JPG to ICO conversion. Windows looked for the file at the old path, found nothing, and fell back to the generic icon. Move the file somewhere permanent and browse to it again.
OneDrive changed the path
When OneDrive starts backing up Desktop, the folder moves from
C:\Users\you\Desktop to C:\Users\you\OneDrive\Desktop. Any icon path
that pointed inside it is now wrong, even though the file is still there.
The icon cache is stale
If the file is in place and the shortcut points at it but Explorer still shows the old picture,
the cache is out of date. Run ie4uinit.exe -show from a command prompt, or delete
%LocalAppData%\IconCache.db and the iconcache_*.db files under
%LocalAppData%\Microsoft\Windows\Explorer, then restart Explorer.
The icon is blurry on the taskbar
The ICO has no 16 or 32 entry, so Windows is shrinking the 256 one on the fly. Go back to the JPG to ICO converter and include the small sizes; Methods 1 and 3 do this by default, Method 4 never does.
Not sure what a file contains? Drop it on the ICO to PNG extractor and it lists every entry inside — that is the quickest way to see whether the 16 is missing.
The icon has a white or black box
White means the JPG background came along in the JPG to ICO conversion, as described above. Black usually means the converter wrote an alpha channel but the viewer ignored it — re-export at 32 bpp, and if you keyed the background, check the result on a dark taskbar. For a stubborn white box, run the JPG through the JPG to PNG background remover first and convert the transparent PNG instead.
Explorer shows the old icon only in some places
The taskbar, Start menu and desktop keep separate caches of every JPG to ICO result you apply. Signing out and back in refreshes all
of them at once; the ie4uinit command above usually does too.
Which ICO Sizes Windows Actually Uses
Microsoft’s design guidance lists 16, 32, 48 and 256 as the sizes an application icon should ship — so those are the sizes a JPG to ICO conversion should produce — with 24 and 64 as optional extras. Here is where each one shows up.
| Size | Where Windows uses it | Include? |
|---|---|---|
| 16 × 16 | Title bars, small taskbar buttons, Explorer details view | Yes |
| 24 × 24 | Windows 10 taskbar at 100% scaling | Optional |
| 32 × 32 | Desktop at small icon size, Alt+Tab | Yes |
| 48 × 48 | Explorer medium icons, desktop default | Yes |
| 64 × 64 | Explorer at 150% scaling | Optional |
| 256 × 256 | Extra-large icons, high-DPI scaling source | Yes |
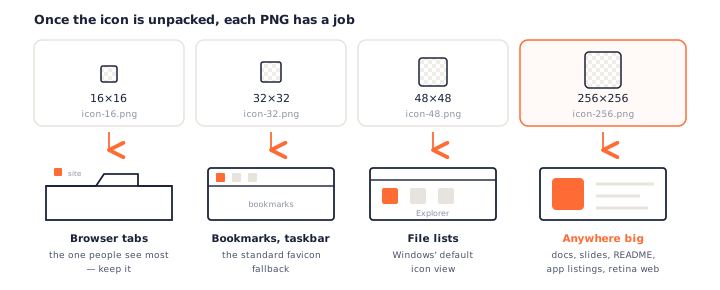
For a Windows 11 shortcut icon, include 16, 32, 48 and 256 pixels. Windows scales 256 down for the sizes in between; leaving out 16 and 32 is what makes taskbar icons blurry.
The PNG to ICO page has the full size table with sources, including which sizes a favicon needs — a different, shorter list.
Frequently Asked Questions
Can I convert JPG to ICO with Paint on Windows 11?
No. The Save As list in Windows 11 Paint offers PNG, JPEG, BMP, GIF and TIFF — there is no ICO option, and Paint 3D was removed from the Microsoft Store in November 2024. Typing .ico into the filename only renames a bitmap. Use a converter that writes a real icon directory, such as the in-browser JPG to ICO converter.
Does Windows 10 work the same way as Windows 11?
The conversion is identical on both. The only difference is the menu: on Windows 10, right-clicking a shortcut shows Properties straight away, while Windows 11 hides it behind Show more options (or Shift+F10). From Properties onward the Change Icon dialog is the same on both versions.
Why does my folder icon keep changing back?
In order of likelihood: the .ico file was moved or deleted (usually from Downloads), OneDrive changed the folder’s path when it started syncing Desktop, or Explorer’s icon cache is stale. The first two are fixed by keeping the icon in a permanent folder such as C:\Icons\ and browsing to it again; the third by running ie4uinit.exe -show.
What size should a JPG be before converting to ICO?
At least 512 × 512 pixels, and square. The largest ICO entry is 256 × 256, and starting from twice that gives the resampler enough pixels to average out JPEG block artefacts. A 4:3 photo has to be cropped or padded to a square first, because every entry in an ICO file must be square.
Can I get a transparent icon from a JPG?
Only by removing a background. JPG has no alpha channel, so a converter can key out one flat colour — white behind a logo, for example — but it cannot recognise an object against a busy scene. For a photo with a real background, cut it out first, save as PNG, and convert the PNG instead.
How do I convert JPG to ICO without uploading my photo?
Three of the five methods here never send the file anywhere. The in-browser converter runs in the tab and works offline once loaded; GIMP and ImageMagick are desktop programs. In our test the browser method took 23 milliseconds for a 1024 × 1024 JPG.
How do I convert many JPGs to ICO at once on Windows?
ImageMagick in one PowerShell line: Get-ChildItem *.jpg | ForEach-Object { magick $_ -define icon:auto-resize=256,48,32,16 "$($_.BaseName).ico" }. The browser converter also takes up to 50 files at a time and packs the results into one zip.
Is JPG or PNG the better source for an icon?
PNG, every time you have the choice. It is lossless, so edges stay clean at 16 pixels, and it carries transparency, so the icon does not arrive with a white box. If the artwork already exists as a PNG, use the PNG to ICO converter; convert JPG to ICO only when the JPG is all you have.
Next Steps
Pick the JPG to ICO method that matches how often you do this: the browser for one-off icons, ImageMagick
for a folder of them. Keep the .ico somewhere permanent, and you will not need the
troubleshooting section.
If the icon is for a website rather than a desktop, the favicon generator builds the shorter set browsers need. And to pull the sizes back out of any ICO — including one you downloaded — the ICO to PNG converter does the reverse. Ready to convert JPG to ICO now? The converter is here, and your photo stays on your PC.
Starting from a PNG instead? Read how to convert PNG to ICO on Windows 11 and 10 — it adds a PowerShell method that needs nothing installed, and the Change Icon steps above apply unchanged. More walkthroughs like this one live on the PNGConvert guides page.