How to Convert PNG to ICO on Windows 11 and 10: 5 Ways (One Needs Nothing Installed)
Microsoft’s current guidance says a Windows app icon needs, at minimum, 16, 24, 32, 48 and 256 pixel versions, and that Windows picks the nearest one for the user’s display scale (Microsoft Learn, Construct your Windows app’s icon, updated July 2026).
A PNG is one image at one size. To convert PNG to ICO on Windows you need something that resamples it four or five times and packs the results into one file — and Paint is not that something.
This guide covers five ways to do it. One of them uses only what Windows already ships. Then it
answers the question the forum threads never do: which of your projects actually wants an
.ico, and which wants the PNGs left alone.
What you’ll learn
- Why PNG to ICO is easier than JPG to ICO, and the three checks worth doing first
- Five ways to convert PNG to ICO on Windows 11 and 10, measured on the same file
- A 25-line PowerShell function that builds a multi-size ICO with nothing installed
- Which file a shortcut, a desktop app, a Store app and a website each need
- Why a transparent PNG can come out with a black box, and how to check
Quick answer: Windows has no PNG to ICO option in Paint or Photos, but it
does have PowerShell. Paste the ConvertTo-Ico function below to
build a four-size .ico with nothing installed — or drop the PNG on a
browser converter for the same result in one click.
PNG to ICO Is the Easy Case — Here’s Why
If you read our JPG to ICO on Windows guide, half of the PNG to ICO work there is fighting the source format: no transparency, lossy edges, a white box on the taskbar. PNG has none of those problems.
PNG already has what an icon needs
A PNG stores an alpha channel, so the space around your logo is genuinely empty. It is lossless, so edges stay clean when resampled. And most logo exports are already square.
That leaves PNG to ICO with one job: making the sizes and putting them in a container.
What the conversion actually does
An ICO file is a container holding the same image at several sizes — usually 16, 32, 48 and 256 pixels — with a 6-byte header and a 16-byte directory entry per image. Since Windows Vista the 256-pixel entry is stored as PNG data; smaller entries may be PNG or plain bitmaps.
Converting PNG to ICO therefore means resampling the PNG to each size, encoding each result, and writing the directory in front. Every method below does exactly that; they differ in what they need installed and how big the file comes out.
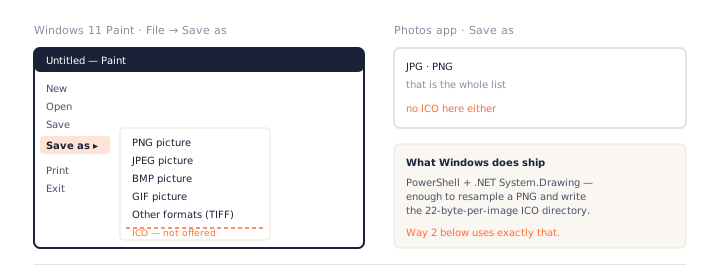
What Paint and Photos can’t do
Open a PNG in Windows 11 Paint and check Save as: PNG, JPEG, BMP, GIF, TIFF.
Photos offers JPG and PNG. Neither writes an ICO, and typing .ico as the name only
renames the file.
A reply on Microsoft’s own answers forum recommending Paint has carried a “correct answer” mark for years. Several replies underneath it point out that it does not work. It still ranks.
📖 Further reading: the PNG to ICO converter page explains the container format and has the full size table with sources.
Prepare the PNG
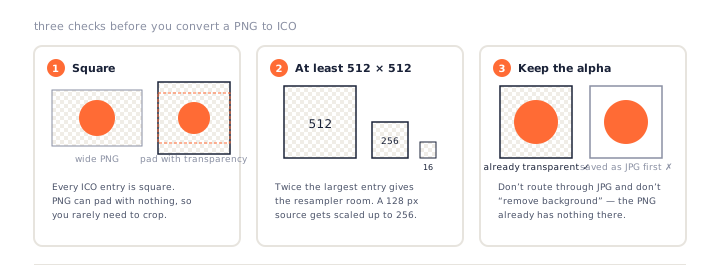
Three quick checks before any PNG to ICO conversion. For a PNG they are mostly confirmations, not fixes — which is the point.
Square, or decide how to pad
Every ICO entry is square. If the PNG is 1200 × 800, something has to give — but unlike a JPG, a PNG can pad with transparency instead of cropping, so nothing is lost. The browser converter does this automatically; the PowerShell script below stretches instead, so square it first.
512 × 512 or larger
The biggest entry is 256 pixels. Starting from twice that gives the resampler room; starting from 128 means the 256 entry is an upscale, and it will look like one.
Keep the transparency you already have
Do not route the file through JPG to “clean it up”, and do not use a background remover — the PNG already has nothing there. Both steps only create work for the transparency section further down.
💡 Pro tip: if the logo exists as a vector, start there. The SVG to ICO converter draws each size from the vector instead of shrinking a raster, which is what the 16-pixel entry needs most. Microsoft’s guidance also suggests checking transparent icons on both a light and a dark background.
Way 1: Convert PNG to ICO in Your Browser
Our own tool, so weigh the recommendation accordingly. It is first because it handles the square-padding and resampling for you and never uploads the file.
Step by step
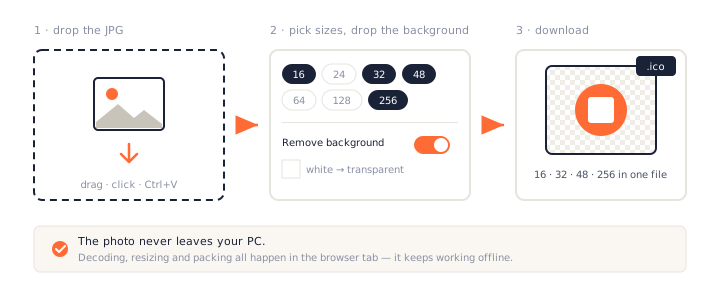
Three clicks, one file
- Drop the PNG. Open the PNG to ICO converter and drag the file in,
click to browse, or paste with
Ctrl+V. Up to 50 files at once. - Pick the sizes. The default is 16, 32, 48 and 256. Tick 24 as well for a Windows 10 taskbar icon; tick 64 if the icon will be shown at 150% scaling in Explorer.
- Download. One
.icoper PNG, or every icon in a zip.
What you get
Four PNG-compressed 32-bit entries — the PNG to ICO output Windows expects. From our 512 × 512 test PNG that was 9.6 KB, encoded in 8 milliseconds in Chrome. Adding the 24-pixel entry took it to 10.3 KB.
Where it fits
One-off PNG to ICO jobs, machines where you cannot install software, and anyone who wants to see the 16-pixel result before committing. It works offline once the page has loaded.
Way 2: PowerShell — Nothing to Install
Windows PowerShell 5.1 ships with every copy of Windows 10 and 11, and it can load the .NET
System.Drawing library. That library can resample a PNG, and the ICO container is
simple enough to write by hand. Put the two together and Windows converts PNG to ICO on its
own.
The script
function ConvertTo-Ico {
  param([string]$Png, [string]$Ico, [int[]]$Sizes = (256, 48, 32, 16))
  Add-Type -AssemblyName System.Drawing
  $img = [System.Drawing.Image]::FromFile((Resolve-Path $Png))
  $frames = foreach ($s in $Sizes) {
    $bmp = New-Object System.Drawing.Bitmap $s, $s, ([System.Drawing.Imaging.PixelFormat]::Format32bppArgb)
    $g = [System.Drawing.Graphics]::FromImage($bmp)
    $g.InterpolationMode = 'HighQualityBicubic'; $g.PixelOffsetMode = 'HighQuality'
    $g.Clear([System.Drawing.Color]::Transparent); $g.DrawImage($img, 0, 0, $s, $s); $g.Dispose()
    $ms = New-Object System.IO.MemoryStream
    $bmp.Save($ms, [System.Drawing.Imaging.ImageFormat]::Png); $bmp.Dispose(); ,$ms.ToArray()
  }
  $bw = New-Object System.IO.BinaryWriter([System.IO.File]::Create($Ico))
  $bw.Write([uint16]0); $bw.Write([uint16]1); $bw.Write([uint16]$Sizes.Count)
  $offset = 6 + 16 * $Sizes.Count
  for ($i = 0; $i -lt $Sizes.Count; $i++) {
    $b = if ($Sizes[$i] -ge 256) { 0 } else { $Sizes[$i] }
    $bw.Write([byte]$b); $bw.Write([byte]$b); $bw.Write([byte]0); $bw.Write([byte]0)
    $bw.Write([uint16]1); $bw.Write([uint16]32)
    $bw.Write([uint32]$frames[$i].Length); $bw.Write([uint32]$offset)
    $offset += $frames[$i].Length
  }
  foreach ($f in $frames) { $bw.Write($f) }
  $bw.Dispose(); $img.Dispose()
}
Copy it as is. The only line you might change is the default size list.
How it works, line by line
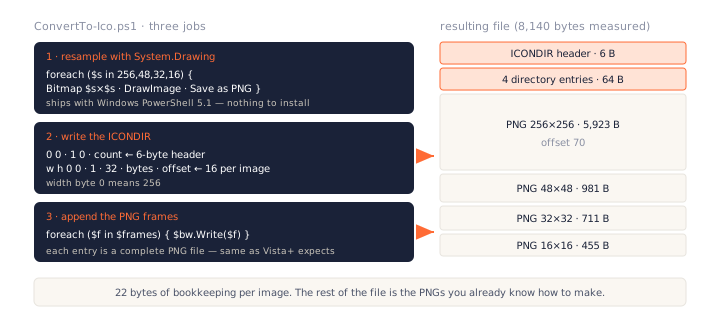
Resample with System.Drawing
For each size, the script creates a 32-bit ARGB bitmap, clears it to transparent, and draws the PNG into it with bicubic interpolation. Each result is saved as a PNG into memory — so every entry in the icon is a proper compressed PNG, the same thing the browser converter produces.
Write the ICONDIR
The header is three 16-bit numbers: reserved, type 1 for icon, and the count. Each entry is 16 bytes: width, height, colour count, reserved, planes, bits per pixel, data length, and the offset where that image starts. A width byte of 0 means 256, which is why the script checks for it.
Append the PNG frames
After the directory, the PNGs are written back to back. That is the whole format.
Run it
Three steps in PowerShell
- Save the script. Copy the
ConvertTo-Icofunction below into Notepad and save it asConvertTo-Ico.ps1in the folder with your PNG. - Load it in PowerShell. Open Windows PowerShell in that folder (Shift + right-click → Open PowerShell window here) and run
. .\ConvertTo-Ico.ps1— the leading dot loads the function into the session. - Convert. Run
ConvertTo-Ico -Png logo.png -Ico logo.ico. A four-size icon appears next to the PNG, ready for the Change Icon dialog or your project.
If the execution policy blocks it
If PowerShell refuses to load the file, the execution policy is blocking scripts. Start
PowerShell once with powershell -ExecutionPolicy Bypass for that session only;
there is no need to change the system-wide setting.
Batch a folder
Every PNG to ICO in one loop
Get-ChildItem *.png | ForEach-Object {
  ConvertTo-Ico -Png $_.FullName -Ico ($_.BaseName + '.ico')
}
What it produced, and its limits
On our 512 × 512 test PNG the PNG to ICO function wrote 8,140 bytes in 271 milliseconds — four PNG entries, all 32-bit, all transparent. ImageMagick read it, .NET read it, and Explorer shows it.
Two honest limits. It stretches a non-square PNG rather than padding it, so square the file first. And it does no sharpening, so the 16-pixel entry is a touch softer than the browser converter’s, which resamples in stages.
On PowerShell 7 the same code needs the System.Drawing.Common package, which is
Windows-only. Windows PowerShell 5.1 — the one in the Start menu — has it built in.
Windows 10 and 11 can convert PNG to ICO with nothing installed: Windows PowerShell 5.1 includes the .NET System.Drawing library, which resamples the PNG, and the ICO container is 22 bytes of bookkeeping per image.
Way 3: ImageMagick
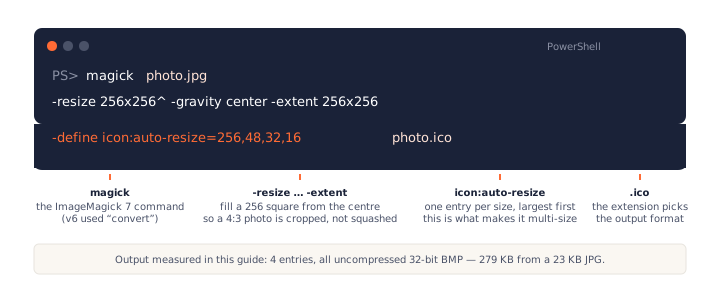
If you already have ImageMagick, or convert PNG to ICO often enough to install it, one command does the job:
One file
magick logo.png -define icon:auto-resize=256,48,32,16 logo.icoA folder, or a non-square PNG
Batching PNG to ICO is a PowerShell loop around the same command, and a non-square PNG can be padded with
-gravity center -background none -extent 256x256 before the define.
Transparency is kept, size is not
ImageMagick 7.1.2 kept the alpha channel perfectly. It also stored all four entries as uncompressed 32-bit bitmaps: 279 KB from a 10.8 KB PNG, roughly 30 times the browser or PowerShell output. Windows does not mind, but a repository will.
📖 Further reading: installation, the -resize … -extent crop and
the parameter breakdown are in the
ImageMagick section of the JPG guide.
Way 4: GIMP
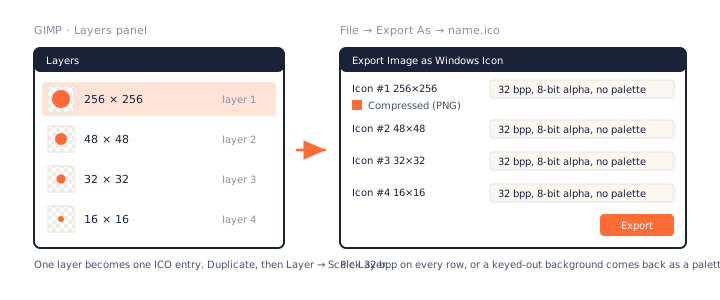
GIMP exports a proper multi-size PNG to ICO result, with one catch: each layer becomes one entry, so you build the size ladder by hand.
The PNG difference
Because the PNG already has an alpha channel, there is no background to remove. Scale the image
to 256, duplicate the layer three times, scale the copies to 48, 32 and 16, then
File → Export As with a name ending in .ico.
In the export dialog set every row to 32 bpp, 8-bit alpha and tick Compressed (PNG) for the 256 entry. Left at the defaults, our headless GIMP 3.2 export kept the alpha but stored the 16, 32 and 48 entries as uncompressed 32-bit bitmaps and only the 256 as PNG — 20.9 KB, about twice the browser or PowerShell output.
📖 The click-by-click version, including the crop and scale menus, is in the GIMP section of the JPG guide.
Way 5: Online Upload Converters
Convertio, FreeConvert, CloudConvert and the other PNG to ICO sites will convert the file after you upload the file. For a public logo that is fine.
What to check first
- Size options. Some produce a single 32 or 64 entry unless you open an advanced panel.
- Transparency. Look for a 32-bit or “keep transparency” option; a few flatten to white.
- Upload limits and retention. 5–10 MB caps and 24-hour retention are typical.
- Where it runs. A few sites, like Picflow, state that conversion happens in the browser — then they are Way 1 with different branding.
We did not put a specific service in the measured table, because the numbers depend on which one you pick and which boxes it exposes.
All 5 Ways on the Same PNG
PNG to ICO test file: a 512 × 512 PNG with a transparent background, 10.8 KB. Each method was asked for 16, 32, 48 and 256 pixels.
| Way | Sizes in one file | Transparency kept | Output size | Needs install | Batch |
|---|---|---|---|---|---|
| 1 · Browser (PNGConvert) | 4 (PNG-compressed) | Yes | 9.6 KB | No | 50 files → zip |
| 2 · PowerShell script | 4 (PNG-compressed) | Yes | 8.1 KB | No | One-line loop |
| 3 · ImageMagick 7.1.2 | 4 (uncompressed) | Yes | 279 KB | Yes | One-line loop |
| 4 · GIMP 3.2 | 4, one layer each | Yes (32 bpp rows) | 20.9 KB | Yes | Manual |
| 5 · Online upload | Varies | Usually | Not measured | No (upload) | Varies |
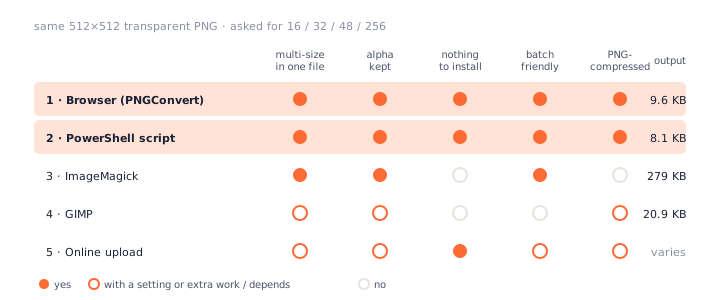
Only two of the five ways are zero-install, multi-size and PNG-compressed at once: the browser converter and the PowerShell script. They also produce the smallest files, because both store every entry as PNG.
Which File Does Your Project Actually Need?
Two of the three Microsoft forum threads that rank for PNG to ICO on Windows were asked by developers who
believed the Store required an .ico. Five answers between them, and not one said
that it does not. Here is what each destination wants.
A desktop shortcut or folder
One PNG to ICO output with 16, 32, 48 and 256. Right-click → Properties → Change Icon → Browse. Keep the file somewhere permanent — the apply-the-icon steps in the JPG guide cover folders, drives and the three reasons an icon reverts.
A Win32 or .NET desktop app
Where the ICO goes
The .exe embeds an ICO at build time, and that is what Explorer, the taskbar and
Alt+Tab show. In a .NET project it is <ApplicationIcon>app.ico</ApplicationIcon>
in the .csproj; in C++ it is an ICON resource in the .rc file;
in Visual Studio it is Project Properties → Application → Icon.
Which sizes
Include 16, 24, 32, 48 and 256 in a PNG to ICO conversion for an executable. This is the one place the 24 matters on Windows 10.
A Microsoft Store (MSIX) app
Not an ICO. The package manifest points at PNG files — Square44x44Logo.png,
Square150x150Logo.png, StoreLogo.png — plus target-size variants such as
AppList.targetsize-16.png up to targetsize-256.png, in unplated light and
dark forms. Microsoft lists every filename in the
app-icon construction guide.
So for a Store app, the job is “make this PNG at fourteen sizes”, not “convert PNG to ICO”. Visual Studio’s manifest designer generates the set from one 400 × 400 source; so does any batch resizer.
Electron, Tauri and other packagers
These wrap a Win32 executable, so they want a multi-size .ico for Windows (and an
.icns for macOS). Electron’s packager asks for 256 at minimum; give it the full
ladder.
A website favicon
A different, shorter list: a favicon.ico with 16, 32 and 48, an SVG, a 180-pixel
Apple touch icon and 192/512 manifest PNGs. The
favicon generator builds that set from one PNG and explains
each file.
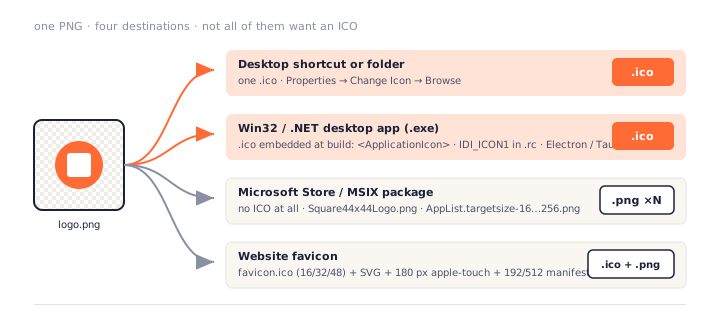
Microsoft Store (MSIX) apps do not use an .ico at all — the manifest points at PNG files such as Square44x44Logo.png. An .ico is what a Win32 executable embeds so Explorer and the taskbar can show it.
Transparency: Why a PNG Can Still Come Out With a Black Box
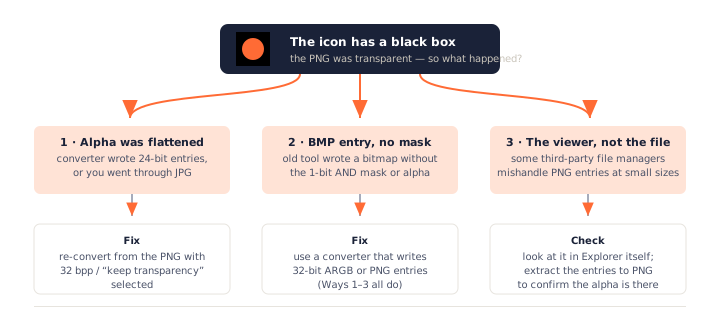
The PNG was transparent, the PNG to ICO result shows a black square. Three causes, in the order to check them.
The converter flattened the alpha
Some PNG to ICO tools write 24-bit entries, which have no room for transparency, and fill the gap with black. Others offer a “background colour” box that defaults to white or black. Re-convert with 32-bit output — every method above does this by default except some online services.
The entry is a bitmap with no mask
Bitmap entries in an ICO carry transparency two ways: an 8-bit alpha channel, or a 1-bit AND mask from the Windows 3.1 era. An old tool that writes neither leaves Windows to guess, and it guesses opaque. PNG-compressed entries do not have this problem.
The viewer, not the file
Some third-party file managers and older programs read PNG entries incorrectly at small sizes and paint a black backdrop — the open-source Files app fixed exactly this bug in 2025. Explorer has handled PNG entries since Vista, so check the icon there before blaming the file.
How to check what is inside
Drop the PNG to ICO output on the ICO to PNG extractor. It lists every entry with its size and bit depth, and the extracted PNGs show at once whether the alpha survived.
Sizes Windows 11 Actually Asks For
Microsoft’s 2026 guidance replaces the old fixed PNG to ICO size list with a table of display scale factors. The 16-pixel slot in a context menu is 20 pixels at 125% scaling, 24 at 150%, 32 at 200% and 64 at 400%. The taskbar starts at 24 and goes up to 96.
Windows looks for an exact match first and otherwise scales the next larger entry down. That is why 256 is in the minimum set: it guarantees Windows never has to scale up.
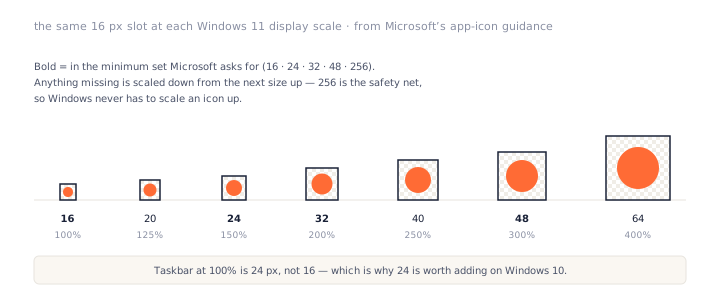
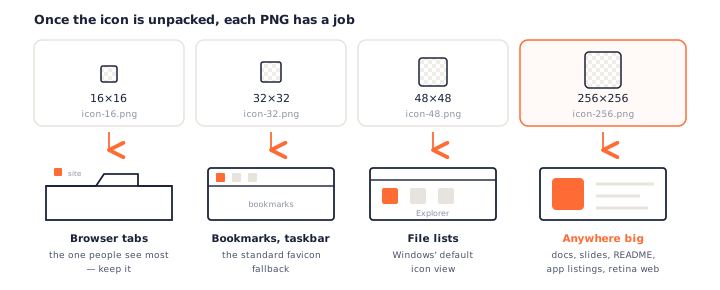
For a PNG to ICO conversion that means: 16, 32, 48 and 256 always; 24 for Windows 10 taskbars and desktop apps; 64 if Explorer at 150% matters to you. The ICO sizes explained section on the converter page maps each size to where it appears.
Frequently Asked Questions
Can I convert PNG to ICO on Windows without installing anything?
Yes. Windows PowerShell 5.1, which ships with Windows 10 and 11, includes the .NET System.Drawing library. The 25-line ConvertTo-Ico function in this guide uses it to resample the PNG and write a four-size ICO — no download, no admin rights. A browser converter is the other zero-install route.
Does Paint or the Photos app save as ICO?
No. Windows 11 Paint offers PNG, JPEG, BMP, GIF and TIFF under Save As; Photos offers JPG and PNG. Typing .ico as the extension only renames the file. An answer on Microsoft’s own forum that recommends Paint has been marked correct for years and is wrong.
Does the Microsoft Store need an ICO file for my app?
No. A packaged (MSIX) app declares PNG assets in its manifest — Square44x44Logo.png, AppList.targetsize-16.png through targetsize-256.png, StoreLogo.png — according to Microsoft’s app-icon construction guide (updated July 2026). An .ico is what a classic Win32 or .NET desktop executable embeds.
Will the transparent background be kept when I convert PNG to ICO?
Yes, as long as the converter writes 32-bit or PNG-compressed entries. The browser converter, the PowerShell script and ImageMagick all do. Transparency is lost only if the tool flattens to 24-bit, or if you saved the PNG as a JPG somewhere along the way.
Why does my icon have a black box around it?
Three causes, in order: the converter flattened the alpha channel to 24-bit; an old tool wrote a bitmap entry with no transparency mask; or the program showing the icon mishandles PNG entries. Check the file in Explorer itself, and extract the entries with the ICO to PNG tool to confirm the alpha is there.
What sizes should a PNG to ICO conversion include for Windows 11?
Microsoft’s minimum for an app icon is 16, 24, 32, 48 and 256 pixels. Windows picks an exact match when it has one and otherwise scales the next size down, so 256 guarantees it never scales up. The browser converter defaults to 16/32/48/256; add 24 with one click.
How do I convert a folder of PNGs to ICO at once?
With the PowerShell function loaded: Get-ChildItem *.png | ForEach-Object { ConvertTo-Ico $_.FullName ($_.BaseName + ".ico") }. ImageMagick does the same with magick in a loop, and the browser converter accepts up to 50 PNGs and returns one zip.
What if my source is a JPG rather than a PNG?
Then transparency is the problem to solve first, because JPG has none. Our guide to converting JPG to ICO on Windows covers keying out the background, plus the Change Icon steps and what to do when a custom icon reverts.
Next Steps
For one icon, use the PNG to ICO converter and keep the defaults — that is PNG to ICO in three clicks. For a folder of them, or a machine where you cannot open a browser, paste the PowerShell function and keep it — it is the one method that will still work on a fresh Windows install with nothing added.
To put the icon on a shortcut and fix it when Windows reverts it, the JPG to ICO on Windows guide has the steps. For a website, the favicon generator builds the shorter set. More walkthroughs are on the PNGConvert guides page.