How to Convert PNG to CUR in 3 Steps
Making a cursor takes one decision that an icon never asks for: where the click lands. The PNG to CUR converter above puts that decision in front of you, then writes a file Windows reads correctly at every size.
PNG to cursor, image to cursor, PNG to CUR — they all mean the same job. CUR is the file type Windows uses for a still mouse pointer.
- Add your image
Drop a PNG into the box above — JPG, WebP and SVG work too — or paste it with
Ctrl+V. A transparent PNG at 128×128 or larger gives the cleanest cursor. - Click where the cursor should click
The editor shows your image on a pixel grid. Click the pixel that should be the click point — the tip of an arrow, the centre of a crosshair — then try it in the test area with your own mouse.
- Download the .cur file
Press Convert to CUR. The file holds all five sizes Windows asks for, 32 to 128 pixels, each with its own correctly scaled click point.
Doing a batch PNG to CUR conversion? Each row keeps its own click point; open a row to set it, then convert the whole list and download it as one zip.
PNG to cursor: choosing a good source image
A cursor is seen at 32 pixels most of the time, so the image has to survive being small. A bold, simple shape with a clear outline works; fine detail and thin lines disappear.
Start from a PNG with a transparent background — anything not transparent becomes a solid square around the pointer. Square artwork at 128 pixels or more gives the sharpest PNG to cursor result, because 128 is the largest size Windows asks for.
An SVG works too and is drawn crisply at every size. A JPG cannot be transparent, so remove its background first, then run the PNG to CUR conversion on the result.
What Is a Cursor Hotspot?
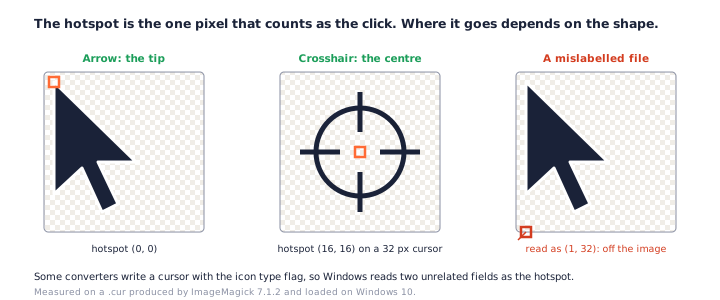
A CUR file is a Windows cursor. It uses the same container as an ICO icon, holding one image per size, plus a hotspot: the single pixel that counts as the click point. Get the hotspot wrong and every click lands slightly off.
For an arrow, the hotspot is the tip. For a crosshair or a dot, it is the centre. For a hand, it is the end of the pointing finger. The picture shows where the pointer is; the hotspot decides what you click.
Why some cursors click in the wrong place
A cursor's hotspot is stored in two fields that an icon uses for something else — colour planes and bit depth. If a converter writes the file with the icon type flag, Windows still reads those fields as the hotspot.
We tested a cursor made by ImageMagick, a common engine behind online converters. Windows loaded its hotspot as (1, 32) — one pixel in and below the bottom of a 32 px image. Chrome ignores the hotspot entirely unless the file is marked as a cursor.
Drop any .cur into the PNG to CUR converter and it reads the file's directory first. A cursor marked as an icon gets a warning, and converting it again writes a correct one with the click point you choose.
Test the click point before you download
Every row in the PNG to CUR converter has a test area. Move your mouse into it and the pointer becomes the cursor you are making. Click the dot: the page reports whether the click landed on it, because the browser measures clicks at the hotspot — exactly what Windows will do.
Which Cursor Sizes Does Windows Use?
Windows picks a cursor size from your display scaling, so a single 32 px image looks blurry on a high-resolution laptop. Microsoft's documentation gives the sizes it asks for:
| Display scaling | Cursor size Windows requests |
|---|---|
| 100–149% | 32 × 32 |
| 150–199% | 48 × 48 |
| 200–299% | 64 × 64 |
| 300–399% | 96 × 96 |
| 400% and up | 128 × 128 |
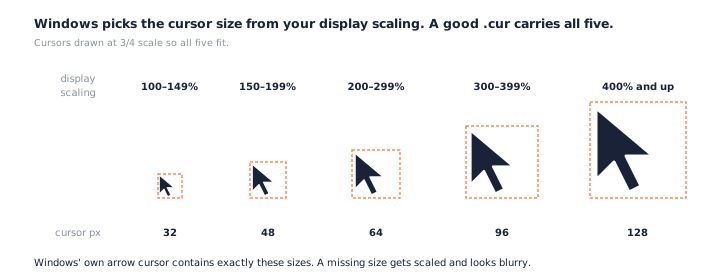
Windows' own arrow cursor, aero_arrow.cur, holds exactly those five sizes. So does
every file this PNG to CUR converter writes, largest first, each with the hotspot scaled to
land on the same spot of your drawing. The pointer-size slider in Settings scales from these
too.
Pixel art needs hard edges
Normal images are resized smoothly. A pixel-art cursor would turn soft that way, so for a pixel-art PNG to cursor conversion, tick Pixel art and each size is drawn with crisp, unblended pixels instead.
How to Install a Custom Cursor in Windows 11
A .cur from any PNG to CUR converter — this one included — has no Install option when you right-click it. You set it from the mouse settings instead — here is the path, as Microsoft documents it:
- Open Settings → Accessibility → Mouse pointer and touch.
- Under Related settings, choose Additional mouse settings.
- In the Mouse Properties window, open the Pointers tab.
- Select the role to replace — for example Normal Select.
- Click Browse…, choose your .cur file and click Open.
- Click Save As… to keep the set as a scheme, then OK.
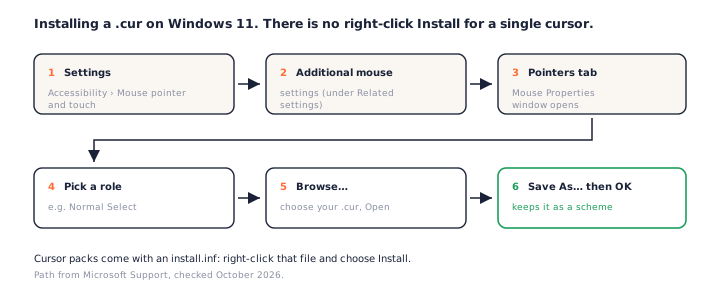
Saving a scheme matters: some users report that changing the pointer style or size later in
Settings replaces custom cursors. With a saved scheme you can pick yours again in one click.
Cursor packs you download usually include an install.inf; right-click that file and
choose Install to set every role at once.
Using a CUR File as a Website Cursor
Browsers accept the result of a PNG to CUR conversion directly in CSS. Pick Web · 32 or Web · 64 and each row shows the line to paste:
cursor: url('arrow.cur') 4 2, auto;
Two rules keep it working. Always end with a keyword such as auto as a fallback —
the CSS is invalid without one. And stay small: Chrome and Firefox ignore cursor images larger
than 128 × 128, and MDN recommends 32 × 32.
CUR vs ICO vs ANI
The three share one family. An ICO holds an icon at several sizes. A CUR is the same container with a hotspot added to each size — so a PNG to CUR conversion is an icon build plus one decision, the click point. An ANI is an animated cursor: a sequence of cursor frames wrapped in a different format.
For desktop and website icons, use the PNG to ICO converter. For a Mac app icon, the PNG to ICNS converter builds the macOS format. To look inside an icon file, extract its sizes as PNGs. And if you are changing icons on Windows too, our guide to converting PNG to ICO on Windows covers the icon side.
Frequently Asked Questions
Is this PNG to CUR converter free? Is my image uploaded?
This PNG to CUR converter is free, with no account and no watermark, and nothing is uploaded: your browser draws every size and writes the .cur file on your device.
What size should my PNG be?
At least 128×128 pixels, and square if you can. The largest size inside the cursor is 128, so a bigger source keeps every size sharp. A non-square image is centred with transparent space, never stretched.
Why does my click land in the wrong place with a cursor from another converter?
Its hotspot is wrong. Some converters leave it at the top-left corner without asking; others write the file as an icon, so Windows reads two unrelated numbers as the hotspot. Drop that .cur here to see what it contains and fix it.
Can I just rename a PNG to .cur?
No. A .cur is a container with a directory and a hotspot for each size; a renamed PNG has neither, and Windows will refuse it. The PNG to CUR conversion builds that container around your image.
Does the cursor keep transparency?
Yes. Every size is stored as a 32-bit PNG with full alpha, so soft edges and shadows survive. Starting from a JPG with a white background? Remove it first with the JPG to PNG converter.
How do I change my mouse cursor on Windows 11?
Settings → Accessibility → Mouse pointer and touch → Additional mouse settings → Pointers tab. Pick a role, click Browse, choose your .cur, then Save As to keep it as a scheme. The full steps are above.
Can I make an animated cursor?
Not here. Animated cursors use a different format, .ani, which stores a sequence of frames. This page makes still .cur files.
Can I use the .cur file on my website?
Yes — pick a Web preset and the PNG to CUR converter shows the CSS. Keep it at 32 or 64 pixels: Chrome and Firefox ignore cursors larger than 128×128.
More Free Converter Tools
This PNG to CUR converter is part of a family of free, in-browser tools on pngconvert.net — same privacy promise, no accounts, no uploads:
Turn PNG images into multi-size Windows icons and favicons.
JPG to ICOCrop a photo square, drop its background, and get a Windows icon.
SVG to ICODraw a vector at every icon size, and see what it loses first.
WebP to ICOEvery size in one icon — and pick the frame if it is animated.
PNG to ICNSA complete macOS icon — all ten Retina sizes, no Mac needed.
ICO to PNGExtract every size from an ICO file as separate PNG images.
WebP to PNGUnpack WebP to a transparent PNG — one frame, every frame, or an APNG.
SVG to PNGRasterize a vector to PNG at any size — 1x, 2x, 3x or a custom width.
AVIF to PNGTurn an AVIF your software won’t open into a PNG that works everywhere.
HEIC to PNGConvert iPhone HEIC photos to PNG in your browser — nothing uploaded.
GIF to PNGOne frame, every frame as a zip, or an animated PNG — you choose.
JPG to PNGLossless PNG from a JPG — and a flat background keyed to transparency.
PNG to WebPShrink PNG to WebP and watch the size drop live — lossy or lossless.
PNG to GIFA GIF encoded in your browser — one still, or several PNGs as one animation.
WebP to GIFAnimated WebP to a GIF that plays anywhere — every frame kept, Safari included.
PNG to JPGConvert PNG to JPG — pick what fills transparent areas, see the size drop.
WebP to JPGConvert WebP to a JPG that opens anywhere — you pick what fills the transparency.
HEIC to JPGConvert iPhone HEIC photos to small, shareable JPGs — nothing uploaded.
AVIF to JPGA JPG that every app and upload form accepts — with the real size change shown.
JFIF to JPGA JFIF is already a JPEG — rename it without losing a byte, or re-encode.
Favicon GeneratorOne logo in, the favicon files you actually need out.